For your convenience, this tutorial will be broken down into short sections, with each section having instructions for different types of files to flash.
How to Update Magisk ZIP and Magisk Manager (without TWRP)Fix Magisk Module Bootloop without TWRP Recovery[Update: Added Magisk 21] Everything About Magisk- Manager, Modules and MoreHow to Fix TWRP Error 20 GApps after flashing LineageOS
Before beginning with the process, keep the following things in mind:
Prerequisites
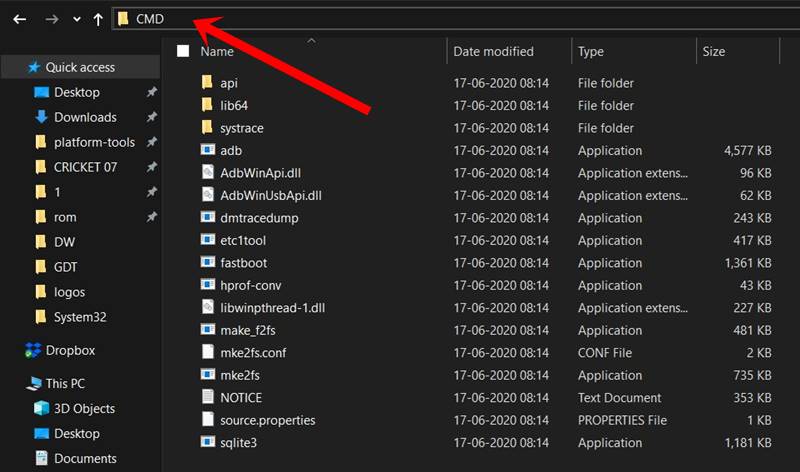
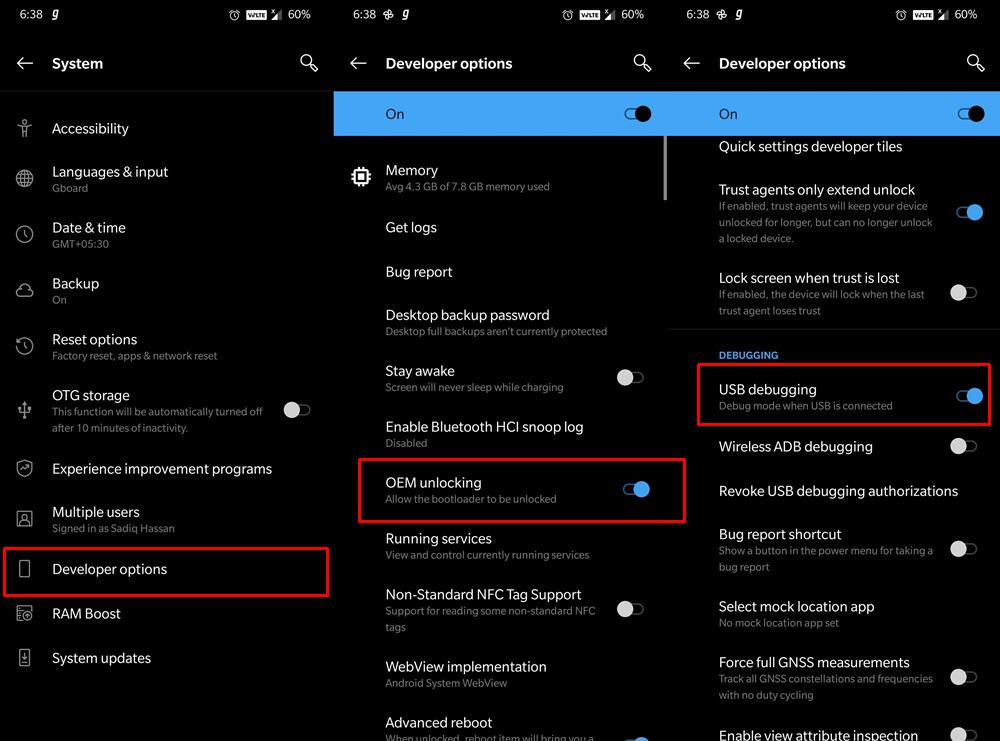
A complete backup of all the data on your device is extremely important. This is because, during the process, your device’s storage will completely be wiped off.Keep your device at a minimum of 60% charged so that it doesn’t turn off in between.Make sure to unlock the bootloader of your device. Refer to our guide on how to do so.Download and install the ADB and Platform Tools. Now head over to this platform-tools folder, type in CMD in the address bar, and hit Enter. This will launch the Command Prompt. Enable USB Debugging and OEM Unlocking on your device: Go to ‘Settings’ > ‘About Phone’ > Tap on the ‘Build Number’ 7 times > Go back to ‘Settings’ > ‘Developer Options’ > Toggle on the ‘USB Debugging’ and ‘OEM Unlocking’ switch.Reference Image
Fix error boot prepare- device stuck in fastbootFix Android stuck in Recovery Mode: No Command screenDetailed Steps to Fix adb is not recognized ErrorHow to Fix FAILED (remote: unknown command) Error
Downloads
Download the TWRP Recovery (both the image and zip file) for your device from the official site. If it isn’t officially released yet for your device, try the unofficial one. It would be available at the XDA forum.Next, download the Custom ROM and Kernel of your choice. Custom ROMs could be downloaded here: Top 5 Custom ROMs based on Android 9.0 Pie (2019). or you could check out the XDA site as well.Also, download the latest Magisk installer zip file: Magisk latest file (for root-access).Finally, download the GApps package corresponding to the device’s architecture and Android OS. Then choose the desired variant.
A note on GApps
Under device architecture, select ARM64 for your device. However, if you want to double-check, download the ‘CPU-Z’ app. Under the ‘System’ tab, look for the ‘Kernel Architecture’- if it is armv7a, armv8l or related types, then it is definitely ARM64.If you are short on time (and also internet), then simply go for the ‘mini‘ variant. It contains the most basic yet important Google Apps and Services. The rest could be downloaded once the device boots up to the OS.Some ROMs like the ‘Pixel Experience’ already have Gapps included, so you wouldn’t be needing it. Always check on the ROMs’ development/support page (or ask me in the comments section) before downloading the Gapps for any ROM.
STEP 1- Setting Up Your Device
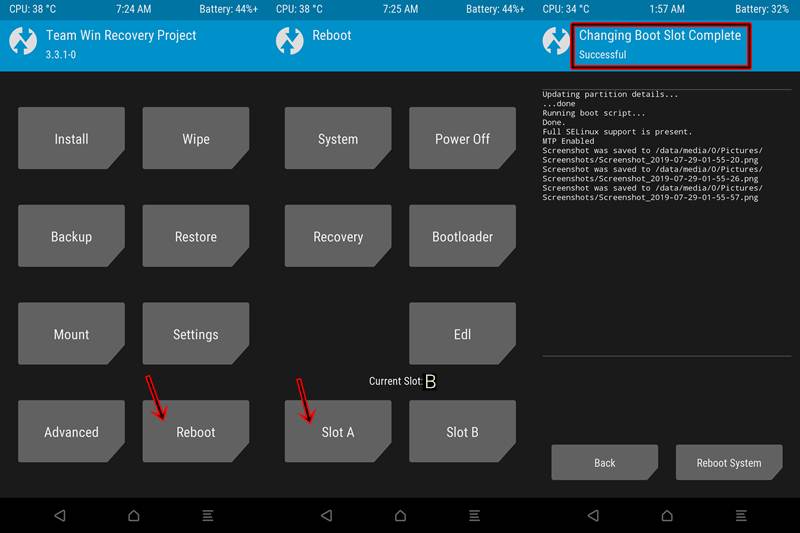
If you are coming from a stock ROM, you need to wipe your data and files. Follow the below points: An important point worth discussing: The custom ROM you are about to flash will be flashed to the inactive slot. So we will be starting this tutorial by taking Slot B as the active slot (hence Slot A would be the inactive slot- where the custom ROM would be installed). If you have Slot A as the active, change it right now by typing the below code in the PowerShell Window:
STEP 2: Installing TWRP Recovery
With Slot ‘B’ as the active slot, we will begin with the installation process. The process starts with booting the TWRP Recovery and then subsequently flashing it on your device. Carry out the below-mentioned steps for the same:
Don’t Miss: How to Boot Any Android Device to TWRP Recovery
That’s it. The first part of the guide on how to flash various files in A/B partition devices is now over. Head over to the next section to install a Custom ROM.
Fix Magisk patched boot.img issue while Rooting Android 11Fix: pip is not recognized as an internal or external commandHow to Update Magisk ZIP and Magisk Manager (without TWRP)Fix Magisk Module Bootloop without TWRP Recovery
STEP 3: Installing a Custom ROM/Kernel/Magisk
DON’T MISS: [GUIDE] Flash ROMs/Magisk/TWRP/Kernels on A/B Partition Devices
Final Thoughts
After performing the above steps, you will be able to boot your device to the TWRP Recovery. Then using the Recovery, you would have flashed a custom ROM. And finally, you rooted the device using the Magisk Installer zip file. Therefore, in a nutshell, this is what we did: Q1) How to boot my device to TWRP recovery if the fastboot boot twrp.img command fails? A1) If the above command fails or gives you a bootloop, ‘force shutdown’ the device and try the above fastboot command again. Q2) “Transferring files using MTP didn’t work”. A2) You may try any one of the following alternatives:
USE THE SIDELOAD METHOD: Transfer the file to be flashed to ADB and Fastboot Platform Tool’s folder. Next, under TWRP, go to ‘Advanced’ > ‘Sideload’ > ‘Swipe to Start Sideload’. Now, in the PowerShell window, enter the following command- ‘adb sideload filename.zip’. USE THE ADB PUSH METHOD: The file to be flashed should be present inside the ADB and Fastboot Tools folder. Under TWRP, go to ‘Advanced’>’File manager’. Now navigate to the ‘data/media’ folder. If the folder named ‘0’ is not present there, then create it. This can be done by going to ‘Advanced’>’Terminal’ and typing the below codes (codes are after the image):
Next, open PowerShell window on your PC and type the below code:
That’s all from the tutorial on How to Flash Various Files in A/B Partition Devices.
Fix error boot prepare- device stuck in fastbootFix Android stuck in Recovery Mode: No Command screenDetailed Steps to Fix adb is not recognized ErrorFix: pip is not recognized as an internal or external command
About Chief Editor